Wednesday, February 29, 2012

Winter Light, & Slow Progress in Sun Dance

Oh boy -- I was itching to paint a landscape this week, although I know I already have way too many projects started, and I really shouldn't attempt a new one. But finally, the ADD in me wins -- yet again! I remembered Kara K. Bigda's exercises of one hour painting, and did this little one in one wetting of the paper! It was intense, nerve-wrecking and so much fun!

I began by wetting the little sheet of 5" x 7" piece of Arches Rough paper front and back using my squirrel quill cat's tongue brush, thoroughly -- I mean dripping wet thoroughly. After the water had totally soaked in, I laid the paper flat onto a piece of plexiglass -- a non-absorbent surface that would keep the paper wet longer (you can also add wet paper towels between the watercolor paper and the plexiglass to extend the drying time even longer). I used 1" flat sable brush from Jack Richeson to paint in the sky using French Ultramarine Blue and Burnt Sienna, varying the pigment strength as I go, and forcing myself not going back and try to rectify the bits of unevenness of painted areas. The granulation effect of French Ultramarine created interesting color separations on the rough surface of the paper. As the paper dried a little, I used fast, upward strokes of the flat brush to drop in a strong mixture of the same two colors, letting the blue dominate, to created the distant woods. This instantaneously created some interesting effects -- some of the warm sienna color was pushed to the upper edge of the trees by the heavier blue pigment (French Ultramarine is a heavily sedimentary color with large pigment particle size, and often pushes the more transparent colors away when applied in mixture or dropped in wet-in-wet), creating a warm glow hinting the setting sun. I really liked this effect, and stopped for a second to appreciate it, before to lift the distant, snow-covered roof in the woods. When the paper is just a tad damp, I applied even heavier pigments with brown dominance to create the foreground dried grasses -- in the end, it's almost dry-brushing in some area. I switched to a rigger brush to paint in the calligraphic branches of the small foreground tree (bush?), and felt totally invigorated by the fast-paced action of painting, in contrast of my usual meticulous, extremely time-consuming way of doing it... 


Winter Light,  Watercolor on Arches 140# Rough Paper , 5"h x 7"w, 2012 #19 

Sold!

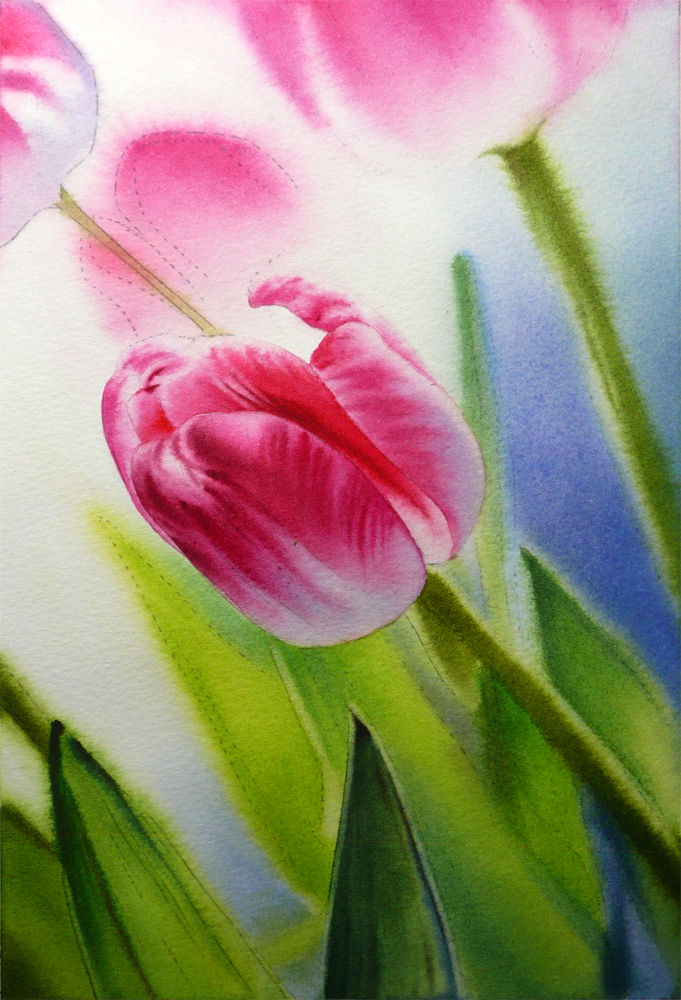
I did go back to the slow motion eventually later into the day, working on the underpainting of the rose painting "Sun Dance" that I started in January (so long ago... :-P). At one point, I felt there is nothing to pin down the values to gauge how dark each passage needs to be, so I selected the lower right corners to do some overpainting using saturated dark pigments (mostly the Thalo colors), carefully letting bits and pieces of the colorful underpainting to shine though to hint undergrowth and dappling sunlight. I am not entirely sure whether I have done that successfully, but decide to move on and paint the lower left side rose leaf stems now that I have something to judge against for how dark they need to be. At this stage, I have the first pass of underpainting on the upper right corner, second and third passes of underpainting on the lower left side, half-finished overpainting in middle bottom, and totally finished overpainting on the lower right corner -- just all over the place! I have the greatest difficulty with this stage since the entire painting just looks piece-meal and incoherent. I guess I just have to put faith in it and believe it would eventually sail-through this ugly stage and emerge as something beautiful (or not)... I am suspicious either Carrie Waller's strategy of finishing one section at a time, or Crystal Cook's way of developing the whole painting to the same stage of finish each time before moving to the next stage is better that what I am usually doing... Time to reflect...


Sun Dance,  Watercolor on Arches 140# Cold Press Paper , 8"h x 8"w, WIP 3 


Tuesday, February 28, 2012

Work in Progress: Edge of Summer, & A Blush of Spring (Continued)

Every year San Francisco hosts a wonderful orchid show at Fort Mason Center, and it was last weekend for this year. I go there ritualistically, purchase some of the potted exotic beauty, take tons of reference photos, in the vain hope that I would be able to paint them all one day... Never once did the orchids I purchase survive, despite of the fact that the weather in San Francisco -- mild and humid with ample indirect, fog-filtered sunlight -- is extraordinarily suitable for orchids to grow, despite my effort in following the instructions sheets for how to care for the flowers, which came with the orchids for free. I have started to believe that I am one of those blessed with "black thumb". This year, I am taking a different approach -- I am acknowledging their inevitable death at some point in the near future, and to commemorate their eternal beauty and liveliness at this moment, I am painting them when they are still healthy and flowering on my window sill...


Edge of Summer,  Watercolor on Arches 140# Cold Press Paper , 5"h x 7"w, WIP 1

I am also trying out a painting technique that's different from my usual approach -- the one I learned by watching the fabulously informative dvd by the amazing master artist Ann Pember. In short, each shape in the painting is wet in advance and the colors are flooded in and mingled in the wet area. Each area is finished in one go with possible minor adjustments by glazing or wetting the area very carefully, and repaint wet-in-wet. There is no road map by underpainting, so it's a bid of a scary game for me, keeping me constantly on my toes. However, it's also greatly exciting... I'm also trying to see and exaggerate color from the most grey shadow shapes of the flower, imaging a harmonic color scheme out of a limited palette of Permanent Rose, New Gamboge and Antwerp Blue.

I also did a bit more work on the tulip painting, "A Blush of Spring", keeping on darkening the background areas and adding more colors wet in wet...


A Blush of Spring,  Watercolor on Arches 140# Rough Paper , 7"h x 5"w, WIP 2

Monday, February 27, 2012

Dancing Tulip IV (Finished)

Sometimes a painting just seems to paint itself -- I am shamelessly in love with this one, and all the stress-free feeling I have experienced painting it...


Dancing Tulip IV,  
Watercolor on Jack Richeson Zoltan Szabo 140# Cold Press Paper , 9"h x 6"w, 2012 #18


Sunday, February 26, 2012

Work in Progress: A Blush of Spring and Summer Wakening

Still in my tulip mode and started a new one. My goal here is to create a light and colorful abstract pattern here behind the tulip, embedded in the overall dark background, hinting the shimmering light through foliage. At this stage the background seems way too "colorful", and I'm trying to control the urge to dull it down too much -- most of the background areas will be very dark upon completion, with hints of colors showing through here and there. You can always dull and darken a passage in watercolor, but it's hard to do the reverse... 


A Blush of Spring,  Watercolor on Arches 140# Rough Paper , 7"h x 5"w, WIP 1

I also did a first pass of base color on some of the pedals, just to remind myself that I want an overall dark blue-green background to contrast with the warm peachy-pink colors in the tulip.

I also did some more work on the rose painting, "Summer Wakening", mostly trying to finish the  underpainting of the blue-green foliage pattern. I'm trying to use a limited palette of Aureolin Yellow, Cobalt Blue, Viridian Green and Permanent Rose here, just to see how much different hues, temperatures and values I can get by mixing these transparent colors. The Cobalt and Viridian also generated interesting granulation effect on paper -- it's a shame that most of them would be covered in the overpainting process...


Summer Wakening,  
Watercolor on Lanaquarelle 140# Cold Press Press Paper , 10"h x 8"w, WIP 3

Saturday, February 25, 2012

Hide and Seek (Finished!)

Some pieces takes much more work than others -- not because of the frustrations you encounter when painting them, but somehow, they just beckon to be put aside after every layer of color, so that they can be looked at with a fresher eye after a while. This is one of them. It started at the beginning of this year, and every time I thought it is close to be finished, something seems to be missing. It was hard to tell exactly what has to be done though, so I had to put it aside and take it out to reevaluate from time to time. For now, I think it is finished. I'm quite happy about the intensity of color and value contrast, and the soft color transitions in most pedals. I will paint a larger version of it and submit it to Illinois Watercolor Society's 24th National Show -- hopefully this time, with the small study as a road map, the progress of the bigger one will be much faster...


Hide and Seek, 
Watercolor on Fabriano Artistico 140# Cold Press Paper , 5"h x 7"w, 2012 #17

Sold!

Friday, February 24, 2012

Work in Progress: Dancing Tulip IV (Continued), & Finishing Work on Hide and Seek

A little more work on what I started yesterday, "Dancing Tulip IV":


Dancing Tulip IV,  
Watercolor on Jack Richeson Zoltan Szabo 140# Cold Press Paper , 9"h x 6"w, WIP 2


I also revisited some older pieces that are still not finished, and decided to experiment with richer reds and oranges on "Hide and Seek":


Hide and Seek,  Watercolor on Fabriano Artistico 140# Cold Press Paper , 5"h x 7"w, WIP 9

Thursday, February 23, 2012

Work in Progress: Dancing Tulip IV

It's been warm and sunny for a few days in San Francisco, and I'm totally caught up in the beautiful mood of spring... So, here's the start of another pink tulip painting, which I am experimenting on Jack Richeson Zoltan Szabo #140 Cold Press watercolor paper. So far, I am totally in love with this paper -- it's pristine white, does not lift easily when glazing, but can lift easy enough when being scrubbed with a synthetic hair brush (not a scrubber), and the surface of the paper does not get easily damaged!


Dancing Tulip IV,  
Watercolor on Jack Richeson Zoltan Szabo 140# Cold Press Paper , 9"h x 6"w, WIP 1

Wednesday, February 22, 2012

Spring Breeze IV (Finished!)

This is officially setting my record of painting -- I managed to finish a 14"h x 10"w painting in less than four days!!! (Ok, I admit this does not look too impressive if we are talking about most other painters, but to me, this feels more than a huge accomplishment...) I am totally exhausted -- three short nights up late painting. At this size, and without larger areas of uniform color, the repeated wetting of each small areas in the attempt of painting the softer, more wet look has caused the paper to buckle a lot -- yes, it is my fault not to stretch the #140 paper before taping it down, but in my defense, buckling is really not a huge problem if you are painting in the size range of 5" x 7", as long as you tape it down. Even if the paper occasionally buckles when they are soaking wet, they usually dry flat. It's not hard to smooth out a painting after it is finished -- take it off the board, wet the back and dry it lying flat underneath weights usually does the trick. However, the uneven surface buckle makes the painting process toward the end rather difficult, since I have to be very carefully not to paint too wet, so that the watercolor on paper surface would not pool in the valleys. Well, next time, I guess I will plan ahead and stretch the paper ahead of time when painting this size, since I usually paint very wet, and wet each area of paper many times before declaring it finished...


Spring Breeze IV, Watercolor on Arches 140# Cold Press Paper , 14"h x 10"w, 2012 #16


Tuesday, February 21, 2012

Work in Progress: Spring Breeze IV (Almost Finished...)

Today is a very very very busy day trying to finished "Spring Breeze IV" so that it can make some submission deadlines that are coming dangerously close... I will be in this hyper-tension state of painting all through March, since there are quite a few shows I want to submit to that have set their deadline in late February through early April. My goal is to submit to 8 - 10 National shows this year across the country, and see how many I could get in. It is time consuming business, and also a bit costly when you add up the application fee, the shipping, the return shipping, the handling fee charged by the show committee, framing, packaging (Art Float Strong Box is incredibly expensive)... So, when I submit to a show, I would try to be careful in choosing the venue of the show -- is it in a city that is art friendly or considered by the collectors as a major art destination? Is the exhibition hosted in a well-located gallery or museum that attracts collectors? Is the time of the show coincide with events such as First Friday Art Walks hosted by the city where the show venue is located?... These are all the factors that could facilitate the sale of artworks in the exhibition. At the end of the day, if I receive an empty return shipping box with a check in the envelop, I would be more than too happy!... :-P


Spring Breeze IV, Watercolor on Arches 140# Cold Press Paper , 10"h x 14"w, WIP 3

Monday, February 20, 2012

Work in Progress: Spring Breeze IV (Continued...)

Compared to the first version of this painting, the 5"h x 7"w "Spring Breeze II", I have tried a different, more controlled approach to created the soft look of out-of-focus flowers and leaves in the background -- to layer all the visible colors one at a time after rewetting each area instead of trying to do them all in one go wet in wet. It's taking longer, but definitely gives more controls of the final color and value of each area. To create a soft transition, I would wet an area slightly larger than what I intend to paint, so that the paints does not stop abruptly at the edge of each shape. So far, I'm happy with this strategy, but slightly worried that with each layer of thicker paints being put on paper surface, eventually they would start to lift off. Let's see how much abuse Arches can afford...


Spring Breeze IV, Watercolor on Arches 140# Cold Press Paper , 10"h x 14"w, WIP 2

Sunday, February 19, 2012

Work in Progress: Spring Breeze IV

I've started to paint a larger version of Spring Breeze II, at a size that can be submitted to juried shows -- 14"h x 10"w is really not large, but for me, it's going to take quite some time to finish. Painting a larger one based on a smaller study (or in this case, a finished painting :-P) is hopefully going to be less time consuming, since there is already a road map for how to finish. We'll see...


Spring Breeze IV, Watercolor on Arches 140# Cold Press Paper , 10"h x 14"w, WIP 1


Saturday, February 18, 2012

Spring Breeze III (Finished)

I finished this small painting today, which was started yesterday by blocking the mail flower and foliage with masking fluid and paint the soft background. Today I peeled off the masking fluid and painted the flower and leaves in focus, and found out -- much to my dismay -- the masking fluid had made the paper surface much rougher and losing some of its sizing, resulting in a grainy look after applying the first wash. Also, the washes dried much too quickly. And I was using Arches #140 Cold Press paper, which is supposed to have a very hardy surface for wear and tear of this kind! Right then and there I thought, in the future unless absolutely necessary (such as in the case of needing to paint a very dark and continuous background without places to stop and rewet), I will not apply masking fluid to my paintings. Even in the case I do, I will try to mask as little places as possible.

In the end, after many glazes, the painting looked fine and the uneven glaze went away with three to four glazes. Perseverance wins again. However, I would like to learn from my mistakes... So, here's my question:

Have you had similar problem when applying masking fluid to Arches paper? Do you know what caused it and most importantly, how to avoid it? If so, please share your experience with me!


Spring Breeze III, Watercolor on Arches 140# Cold Press Paper , 9"h x 6"w, 2012 #15


Sold!

Friday, February 17, 2012

Work in Progress: Spring Breeze III, & (Old) News of Richeson 75 Small Works 2012 Show

More tulip paintings... I have two more in line, and I am temporarily obsessed of how to get all those different shades of pink vivid and distinctive. I have also done two big ones for Watercolor Art Society - Huston (WAS-H) and North West Watercolor Society shows, and now a third one for the Society of Watercolor Artists - Fort Worth Show. Time is catching up with me...

In this one I have glazed the background again and again with mixtures of Cobalt Blue, Peacock Blue, Ultramarine Blue, Aureolin Yellow, Quinacridone Gold, Permanent Sap Green, Viridian Green and Hooker's Green to try to achieve the soft light-ringed effect on the background, leaving subtle bands of darker, muted greens in diagonal passages to contrast with the round forms of lighter shapes. On larger backgrounds where a single flower is painted, it is very easy to make viewer lose their interest if the background is painted more or less uniformly or randomly (total randomness is processed by human eyes as white noise, and hence treated somewhat like uniformity). Glazing is relatively easy on Arches Cold Press paper, but repeated glazing do disturb the initial interesting granulation effects formed by dropping Cobalt, Ultramarine and Viridian onto wet paper surface. 


Spring Breeze III, Watercolor on Arches 140# Cold Press Paper , 9"h x 6"w, WIP 1

Finally, before I forget again -- this is old news now but the Richeson 75 Small Works 2012 Show is now online! The show is in Richeson Gallery in Kimberly, Wisconsin for viewing from February 6th to March 30th, so if you are in the area, feel free to drop by and take a look! I am honored to have my work "High Summer Dream" juried into this show -- the quality of work included in this show makes my jaw drop...


High Summer Dream (Juried into Richeson 75 Small Works 2012 Show), 
Watercolor on Arches 140# Cold Press Paper, 10"h x 14"w, 2012 #1

Bid at My DPW Auction (Starting Bid $150)

Thursday, February 16, 2012

Work in Progress: Summer Wakening and Peppermint Rose

Some more work on both of the rose paintings... Learning from the "Dancing Tulip" painting, I paid more attention to keep the underpainting color passages light and thin to leave enough grip on the paper surface. I found that rewetting and glazing is slightly easier on Lanaquarelle paper comparing to Fabriano Artistico, and the color does not lift as easily, though still easy enough to allow corrections by lifting. I also really loved the surface texture of Lanaquarelle... Granulating colors work so beautifully on them.


Summer Wakening,  
Watercolor on Lanaquarelle 140# Cold Press Press Paper , 10"h x 8"w, WIP 2

I found that it is easier to look at a section of the painting before wetting it and dropping in color, imagine what color you would drop in first, then adding what brushwork where -- this kind of rehearsal really helps me to do the wet-in-wet applications more confidently, with less regret of "coulda shoulda woulda". You have much less control when wet color is spreading on wet paper, so I feel I need all the preparation I can get!


Peppermint Rose,  
Watercolor on Fabriano Artistico 140# Cold Press Paper , 8"h x 8"w, WIP 2

Wednesday, February 15, 2012

Work in Progress: Dancing Tulip (Almost Finished...)

Actually, it's not quite finished. The background and foliage started as underpainting colors, which needs to stay very thin on soft paper like Fabriano Artistico, so that they don't end up congesting the paper surface. Unfortunately, in the search of right hue and value relationships, I kept on adding more any more pigments, and -- before I recognize there are already lots of pigments on surface. I made a decision to switch to a more direct painting method after discovering this, finishing them section by section, and adjusting the whole painting with slight glazes here and there to pull all the finished sections together. 


Dancing Tulip,  Watercolor on Fabriano Artistico 140# Cold Press Paper , 5"h x 7"w, WIP 3

I discovered a squirrel hair cat's tongue style brush very suitable for wetting and glazing larger areas on soft paper like this one, since the softer hair does not lift color as easily even compare to sable, which otherwise is a huge problem on papers made by Fabriano and Lanaquarelle, where pigments tends to stay more on surface and sink in less, allowing easy correction by lifting but makes last minute adjustments by glazing over larger painted areas very scary. Also, squirrel hair carries large amounts of water and deposit them on paper not all together like synthetic hair brushes would do, The Sharp tip of a cat's tongue brush can get into tight corners, while the larger body like a flat brush would arrow them to carry even more water comparing to round brushes made by the same hair.

Monday, February 13, 2012

Work in Progress: Dancing Tulip I and Petal Light (Continued...)

Another busy day running around in and out of the studio... Working a little bit on the First Dancing Tulip painting, testing out all the bright yellow-green springy colors to contrast with the reddish-purple flower, and putting in some wet-in-wet washes in the background echoing the flower color:


Dancing Tulip,  Watercolor on Fabriano Artistico 140# Cold Press Paper , 5"h x 7"w, WIP 2

And the ever-so-slow development of Petal Light continues... I am struggling over trying to darken the values of leaves in shadow without killing the colors too much or congest the surface with pigment. Luckily, Arches Paper is really great in that aspect -- due to the surface sizing pigments do not stay on surface as much as they do on softer papers such as Fabriano Artistico. The underpainting is getting close to be done, unfortunately, so is the deadline for picture submission....


Petal Light #1, 
 Watercolor on Arches 140# Cold Press Paper , 10"h x 8"w, WIP 4

Sunday, February 12, 2012

Work in Progress: Peppermint Rose and Petal Light

In the show season (beginning months of every year) things can get quite crazy -- I am juggling the small daily painting pieces alongside with the bigger ones that are meant to be submitted to juried shows, struggling to get both into the limited time frame, plus all the photography, framing, shipping ... And I'm sure I would not be the only one here!

In the frenzy of things I did manage to get another rose painting started:


Peppermint Rose,  
Watercolor on Fabriano Artistico 140# Cold Press Paper , 8"h x 8"w, WIP 1

In addition, I am struggling to try to finish the underpainting on the leaves of Petal Light #1. The difficulty here is to really see the subtle color variations in the shadows of the leaves, which would add interest to these otherwise even, featureless areas. Shadows on photos taken on a sunny day are normally too dark and colorless due to underexposure, so I have adjusted the brightness/contrast of the photo to bring out these otherwise invisible color changes. They may be all lost after the overpainting is done, but at the underpainting stage, I think it is better to put in too much information than too little -- I can always choose to paint these information away wet-in-wet during the overpainting, after all...


Petal Light #1,  Watercolor on Arches 140# Cold Press Paper , 10"h x 8"w, WIP 3

Saturday, February 11, 2012

Dancing Tulip III (Finished!)

What happened to Dancing Tulip I and II? Well... Truth be told, they are still under development... I got caught in the pink mode while developing a larger (10" x 14") version of "Spring Breeze II) to submit to the International Exhibition hosted by Watercolor Art Society - Huston (WAS-H), and decided to finish this little painting afterwards to continue my exploration of different shades of pink. I am quite happy with the results, and feeling that I am gradually getting the hang of painting small on rough paper. And I have to admit -- Arches paper can really take a beat! Using a scrubber brush I was able to regain the lost white on the pedals after layers and layers of washes...


Dancing Tulip III,  Watercolor on Arches 140# Rough Paper , 7"h x 5"w, 2012 #14

Bid at My DPW Auction (Starting Bid $55)

Friday, February 10, 2012

Work in Progress: Cardinal (My First Animal Painting!)

Back to watercolor painting today... To continue the scary but exciting journey, I tried my hands on something new -- my first animal painting! I did the drawing for this painting several years ago in a workshop with an amazing artist, Terry Armstrong, when I was still in graduate school in Indiana. I did not actually get to the painting part in that workshop, since I drew too slowly... (Yes, besides watching painting demos by Terry and finish this drawing, I did not accomplish anything in that workshop... =___=b...) I came across the drawing again and decided to give it a try to refresh what I have learned during that workshop: doing the indication of feather patterns wet in wet as big washes, then using fine brushes to paint the feathers here and there, but not all over the body -- mostly in the mid tones and on the edges of the bird shape. So far I'm quite happy with how it turned out. Fingers crossed since I am going to do a big wet-in-wet washes on the background... Terry has this method of masking the center of focus with masking tape after finishing them, then splash the background with free, direct strokes of wet-in-wet color application as well as masking fluid application. He also mixes his colors with egg-yolk to create more prominent granulation effects in the background, which I would like to try on this one. But maybe I should experiment on scrape pieces of paper first...


February Flame - Red Cardinal,  
Watercolor on Arches 140# Cold Press Paper , 11"h x 14"w, WIP 1

Thursday, February 9, 2012

Oil Painting Class: Orange and Peppers

In February I've started a scary but exciting new journey -- I've taken up an oil painting class with the amazing artist David Cheifetz in Palo Alto. The beautiful thinly painted shadows, intriguing compositions and juicy, glowing colors together with the confidently executed brushwork in his painting lured me into this class -- before which I was seriously intimidated by the thought of taking up oil painting. But, after learning that he only started painting in oil in 2007 (!!!), I decided I have to study with him and steal the secrets... (;-P)

David was trained in the Schuler Atelier School in the classical lineage. His work was built on top of a solid foundation of brush drawing, but differs from (what I understand) classical still life in their confident brushwork (a lot classical oil paintings emphasize the rigorous blending of any brushwork) and dramatic lighting. He is also an equally great teacher -- I've only taken three classes with him so far, but I've learned a ton:
  • A painting starts with straight-line block-in of main object shape, cast shadow and form shadow shape, which are sketched in before the painting part starts with Burnt Umber mixed with Gamblin Gamsol, normally on an umber-toned ground. David usually use Burnt Umber for his still life paintings, and Raw Umber for his figure paintings, since the cold greenish tinge of Raw Umber sets off the warm skin tones of the figure beautifully;
  • After straight-line block-in of the shadow shapes, the entire shadow side (including the form shadows and cast shadows) are blocked in with flat Burnt Umber mixed with a little Gamsol, very thinly but dark enough to differentiate from the light side;
  • The actual painting starts from areas around highlights -- where the color is the riches and most saturated. After that, highlights are immediately put in thickly -- now you have both the light, mid-tone and shadow values in an object. In this step, David would mix the color pigments with his favorite medium, Gamblin Neo-Meglip Gel Medium to allow more fluid brushstrokes;
  • Slowly block in the various color-values in the light side of the object, studying each section carefully before putting brush to canvas/board, painting attention to both the value and the color of the brush work. David does not pre-mix, instead, he mix each brushstroke of color on the go using his filbert brush. Each color patch is carefully mixed, laid-in, then manipulated on canvas to create the corresponding edge effects: hard, soft, diffused...
  • Only when the entire light side of the object is done would David move t the boundary between light and shadow, and lay a dark color swatch parallel to the edge of the shadow, partly in the light section and partly in shadow to connect the two. Then he would check the value steps between the most saturated color section and the edge of shadow, making sure the value transition is consistent with what's showing in the object you are painting;
  • David emphasizes that making what he calls "Starts" to be the most important of this training process -- the detailed steps of which is described above, and ask his students to do one "Start" of each three-hour painting session. This is very critical to getting the most out of the training time, according to his opinion. He also ask us to pay close attention to the quality and accuracy of the block-in lines, the way brushstrokes are laid when painting, and the value of each stroke put on canvas/board (value is more important than color!). He is kind but strict, and does tons of hands-on demonstrations on our canvas to illustrate each point he emphasizes...
  • At the end of each three-hour session, he suggests us to wipe-off any unfinished painting after taking a photo as a record of what we have done. This way would ensure we are not so attached to the painting itself and try to fiddle and finish it at home. "The next painting would always be better than the last one!" This is absolutely right -- I am reminded each time that the purpose of me coming to these classes is not to finish a painting and having something to show around, but to practice and exercise under the guidance of a master painting, and get the most out of it!
So, what have I produced so far? Not much -- I did one single-colored object for each of the three-hour sessions, first an orange, then a red chili pepper, finally a yellow bell pepper to explore how to paint shadows on yellow objects -- since yellow has such a short value range (as you can see, I am still obsesses with my yellow rose experiment... :-P).

The orange is my first attempt and a bit of a disaster -- I have no experience in oil painting, and the support I was using -- Ampersand Gesso Board is very slick. As a result, I have very thick paints on the board, and my brush is slipping around with no control of brushwork whatsoever. The highlight is painted as a single round dot -- no edge quality or shape accuracy. But, everything has to start somewhere!


Oil Painting Session 02/01/2012, on Ampersand Gesso Board

I got slightly better on the red chili pepper -- this is my second brush drawing and I wiped the whole drawing at least three times in frustration, but I did learn to control my brushes a little better, and finally learned the right quantity of pigment and Gamsol in the brush to make a thin, deliberate line. David showed me how to manipulate paint to create fussy edges of the intricate highlight shape, and I tried it on my own -- not too successfully, but definitely improving compared to my last attempt...


Oil Painting Session 02/06/2012, on Ampersand Gesso Board

The third time, I experimented with a different ground -- RayMar Fine Weave Linen Canvas Board, on which color is absorbed much more than the Gesso Board. They have a good grip on the brush which I like, but the color definitely is less brilliant compared to the Gesso Board. I also experimented with less pigment on the brush to avoid pigment pile-up on canvas. On some sections of this painting, the pigments seem to be spread too thin -- I am still struggling to find the right amount. But, I feel that my brush-handling has definitely improved. I am squinting more to look at the big value changes. And my initial block-in lines got much better! This "Starts" are really great exercises indeed...


Oil Painting Session 02/08/2012, on RayMar Fine Weave Linen Canvas Board

At the end of each session I wiped the painting straight up -- after taking these photo evidences. I will keep on trying -- maybe one day, there would be something worth keeping. But until then, I am going to be satisfied of being able to take the lessons learned and skills improved back home with me...

Wednesday, February 8, 2012

Yellow Rose (Finished?...)

I worked more on the yellow rose painting today and (I think...) finished it. I really like how the leaflets beneath the pedals turned out, and I was happy that I took the courage to fix the dark, reflective ring-like structures around the flower due to paint accumulating at the boundary of background washes. I think I've learned a ton doing this painting, and I will keep on experimenting with three smaller versions of it to see which method to paint shadows works best for me...


Yellow Rose,  Watercolor on Lanaquarelle140# Cold Press Paper , 8"h x 8"w, 2012 #13

Sold!

Tuesday, February 7, 2012

Figure Drawing Session I (6 Sessions Starting 02/07/2012)

I had a very busy day today, but not actually painting. Instead I planned out for the current Daily Paintworks Challenge "White on White", and the Cook-Waller Painting Challenge for February, "Love Letter", and went out to purchase the flowers needed, set them up and photographed them. I have several good concepts, which I would like to explore, but probably none of them would get done within this week -- as you probably have already noticed, I am an extremely slow painter, and there are several deadlines coming up for shows...

I also worked on a potential commission piece of poppy flowers, did some colors sketches that I'd like to send to the potential customer before deciding a final format. I would probably show them in a later post, when the final painting is done...

In the evening my time was spent doing a long-pose figure drawing at the new studio of the amazing artist, Sadie Valeri. I just love and admire her work!... I started to study drawing, especially figure drawing with her in the summer of 2009, and her work -- both drawings and oil paintings -- are absolutely stunning! (Check it out if you haven't already -- it would not disappoint you, I promise!) The methodical planning and patient execution of her work is something I greatly admire, and try to learn from. 

The figure drawing session she set up in her studio is something that is not easy to find but absolutely useful -- it's one pose, six three-hour sessions or six six-hour sessions, for people to practice classical atelier method of figure drawing/painting. I worked on the first straight-line block-ins during the session this evening -- as you can see, only a few lines after a whole three-hour slot. It's extremely slow... 


Figure Drawing Session I 02/07/2012, Graphite on Strathmore 400 Series Drawing Paper

Sadie's method (which I am practicing here) basically starts from putting down a top and bottom line for a vertical format drawing, and ensure the figure would never exceed that top and bottom line, so that the figure can be composed on the paper without the worry that the feet is just going to grow out of the page as you adjust the drawing later. Then a middle point is drawn on the page and corresponding middle point is measured on the model, and a mental note is being kept for where that middle point locates on the model's body. This middle point on the page would never change from this point on, and corresponding measurements can be made against it. 

The next steps are estimating the width of the figure on the widest point comparing to its height, and make tentative left and right boundary lines. From there on, long, straight envelope lines are made to enclose the whole body of the model on paper by imaging these long, straight boards making tangent to the "high points" of the entire body shape, and smaller, more segmented lines are drawn to enclose more and more detailed shapes of the body outline. It is very important when drawing the shorter, more detailed lines, one should extend them and see where the extended lines intersect the figure on paper, and compare that against the place these imaginary extension lines intersect with the model's body, since it is extremely hard to measure the angle of a short line, but relatively easier when they are extended longer. It's also very helpful to compare various lines of similar angles to one another, since it is much easier for our eyes to differentiate relative angles than absolute slants. Contrary to the more traditional "sight-size" method, in this method only angles of lines are measured (against horizontal or vertical reference lines) and translated onto paper, not the absolute length of the line. 

It's an extremely slow process to draw using this method, but also a great training for observation, estimation and hand-eye coordination. I was just trying to get the big proportions and gestures of the body right on paper tonight, and it would need quite a bit of work in the next session, probably...

Related Posts Plugin for WordPress, Blogger...